
One of the biggest myths in online marketing is that building effective sales systems requires complex technical knowledge or endless hours of setup.
 Truth is, it doesn’t have to be complicated at all.
Every week, I talk with entrepreneurs who are overwhelmed by all the options and “expert advice” about email marketing. They’ve been led to believe that creating automated systems is some kind of advanced skill reserved for tech gurus.
I’m here to tell you that’s completely false.
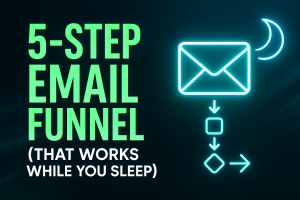
Today, I’m going to show you a simple 5-step email automation funnel that literally works 24/7, turning casual visitors into loyal customers even when you’re offline. This is the exact system I’ve used to generate consistent revenue across multiple businesses – and it’s something anyone can set up, regardless of technical ability.
The beauty of this approach is its simplicity.
No complicated integrations.
No confusing workflows.
Just a straightforward system that works while you sleep, spend time with family, or focus on other parts of your business.
If you can write an email and click a few buttons, you can build this system using tools like ActiveCampaign or our own SendPad. Let’s break it down into five manageable steps that you can implement today.
Step 1: Collect the Right Leads (The “Entry Point”)
The foundation of any successful email automation is getting the RIGHT people onto your list.
Not just any random subscriber – but people who are genuinely interested in what you offer.
Here’s how to set this up:
- Create a highly specific lead magnet that solves ONE problem for your ideal customer
- Set up a simple opt-in form to collect name and email (and possibly phone number)
- Place this form strategically on your website, blog, or landing page
Remember – the more specific your lead magnet, the better your results will be.
For example, instead of offering a generic “Guide to Online Marketing,” try something hyper-targeted like “5-Point Checklist: How to Launch Your First Amazon Product in 30 Days” or “7 Email Templates That Generated $50,000 in Affiliate Sales.”
This specificity does two important things:
- It attracts people with a very specific interest (perfect for segmentation)
- It promises a quick win (increasing opt-in rates)
You can easily add these opt-in forms using tools like Elementor, PixaPage, or directly on your blog. The technology doesn’t matter nearly as much as the offer itself.
Pro Tip: Test different lead magnets for different traffic sources. Your Facebook audience might respond better to a checklist, while your blog readers might prefer a toolkit or template.
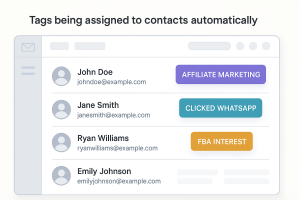
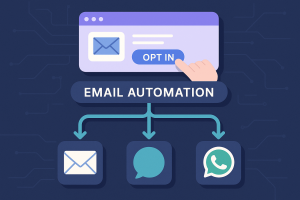
Step 2: Segment Instantly with Tags or Custom Fields
Once someone opts in, the magic of automation begins.
 This is where we start personalizing the experience without lifting a finger.
The moment someone subscribes, we want to instantly “tag” or categorize them based on:
- Which lead magnet they downloaded
- What page they were on
- Any specific interests they indicated
For example, if someone downloads your “Amazon FBA Checklist,” you’d automatically add a tag like “Interested-Amazon-FBA” to their profile.
This simple step is absolutely critical because it determines what content they’ll receive in the future.
In ActiveCampaign or SendPad, this is as simple as adding an automation step that applies a tag when someone completes your form.
If you’re collecting phone numbers for SMS or WhatsApp follow-up (which can dramatically increase engagement), you can set up an integration with Hilos through ActiveCampaign to tag subscribers who provide their number.
Pro Tip: Don’t go overboard with tags at first. Start with 3-5 main interest categories, and expand as your system grows more sophisticated.
Step 3: Trigger the Automation
Now that your new subscriber is tagged, it’s time to trigger your welcome sequence. This is the series of emails that introduces them to your world and starts building the relationship.
 A simple but effective welcome sequence might look like this:
Email 1 (Immediate): Deliver your lead magnet + short personal story
- Subject line: “Here’s your [lead magnet name] (plus a quick story)”
- Deliver the promised resource with clear download instructions
- Share a brief personal story related to the topic
- Set expectations for what’s coming next
Email 2 (Day 2): Value-add content that expands on the lead magnet
- Subject line: “A quick tip to make [lead magnet] even more effective”
- Provide additional context or tips that make their download more useful
- Include at least one actionable suggestion they can implement today
- End with a question to encourage engagement
Email 3 (Day 4): Light CTA (Call-to-Action)
- Subject line: “Quick question about your [topic] goals…”
- Share a relevant success story (yours or a student’s)
- Present a logical next step (watch a video, reply to the email, or click for more info)
- Create a sense of opportunity without heavy sales pressure
If you’re also using SMS or WhatsApp via Hilos, you might trigger a short message after Email 1 to check if they received the lead magnet and if they have any questions. This personal touch can significantly increase engagement rates.
Pro Tip: Write all three emails at once to ensure they flow logically from one to the next. This makes the automation feel like a cohesive experience rather than disconnected messages.
Step 4: Build Trust with Behavior-Based Follow-Up
This is where your automation truly becomes intelligent. Based on how subscribers interact with your initial sequence, we’ll send them down different paths.
Here’s how to set this up:
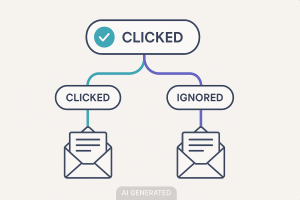 For Those Who Engage:
- If they open emails and click links, tag them as “Engaged”
- If they click on specific content (like a case study), add a relevant tag (e.g., “Watched-Case-Study”)
- Send these engaged subscribers a more direct invitation to your offer
For Those Who Don’t Engage:
- If they don’t open emails or click links, tag them as “Nurture”
- Send these subscribers a re-engagement sequence focused on value, not selling
- Try different subject lines or content approaches to spark interest
In SendPad, you can create these conditional paths using visual workflows that make the process intuitive. If you’re using ActiveCampaign, set up “If/Else” paths or “Goal” steps to create these behavioral branches.
This behavior-based segmentation is powerful because it ensures you’re not sending sales messages to people who aren’t ready, while also identifying your hottest prospects for more direct follow-up.
Pro Tip: For subscribers who engage heavily with specific topics, create a “fast track” sequence that moves them more quickly toward relevant offers. They’re showing you they’re ready!
Step 5: Nurture With Consistent Broadcasts or Campaigns
The final piece of your automation puzzle is ongoing nurture content. This keeps your subscribers engaged over the long term while moving them closer to your offers.
Here’s what to include in your nurture strategy:
Weekly Newsletter:
- Consistent delivery (same day/time each week)
- Mix of valuable content, stories, and soft promotions
- Always include links that help you segment further (e.g., “Interested in Amazon FBA? Click here” that adds an “FBA-Interest” tag)
Special Updates:
- Announce new blog posts, podcasts, or videos
- Invite subscribers to webinars or live events
- Share case studies or success stories
Soft-Sell Emails:
- Start with a helpful story or insight
- Transition naturally to how your product/service relates
- Include a clear but gentle call-to-action
The key is consistency. Even one email per week is better than sporadic communication. If you struggle with content creation, tools like Manus or ChatGPT can help you draft newsletters based on your topic ideas.
Pro Tip: When sending broadcasts, always include at least one trackable link that adds a tag based on interest. This continuously refines your segmentation without requiring subscribers to fill out more forms.
Putting It All Together: Your 24/7 Sales Machine
Let’s recap how this 5-step system works:
- Collect the Right Leads with a specific, valuable lead magnet
- Segment Instantly based on what they downloaded or indicated interest in
- Trigger the Welcome Sequence to deliver value and build relationship
- Create Behavior-Based Paths that respond to their engagement level
- Maintain Consistent Communication with regular nurture content
What makes this system so powerful is that once it’s set up, it runs on autopilot. Your only ongoing task is creating your weekly broadcast emails – everything else happens automatically.
But the best part?
This entire system can be set up in under a day.
You don’t need complex technology or advanced marketing skills. Just follow the steps I’ve outlined, and you’ll have a functional automation funnel working for you 24/7.
Ready to Get Started?
The key to success with email automation isn’t perfection – it’s implementation. Pick one lead magnet and start with Step 1 today.
You can always refine and improve as you go.
Remember, every day your automation isn’t running is a day you’re leaving money on the table.
These systems work while you sleep, while you’re with family, and even while you’re building other aspects of your business.
If you found this helpful, make sure you’re subscribed to Online Marketing Classroom (there’s a signup box at the top right of this page). When you sign up, I’ll send you more content EXACTLY like this to your inbox every single week.
Plus, it’s all free!

